Plugin
Namespace: App\Infrastructure\Services\Plugin
| Method | Description | Type | Parameters | Return |
|---|---|---|---|---|
| __construct | throws ContainerExceptionInterface throws ReflectionException throws NotFoundExceptionInterface |
public | ||
| meta | Plugin meta data | abstract public |
||
| handle | Handle method to execute when plugin is activated |
abstract public |
void | |
| id | Plugin's id | protected | ||
| name | Plugin's name | protected | ||
| path | The plugin's directory path |
protected | string | |
| route | Plugin's route for submenu | protected | ||
| url | Plugin's url | protected |
When creating a plugin, you can extend the abstract class Plugin and implement the two abstract methods meta and handle. The meta method returns an array of info about your plugin, and
the handle method is called by the system to load assets, views, etc. The following 6 steps will walk you through creating your first plugin.
Best Practices in Plugin Development
Devflow is a framework, allowing php developers to build bespoke websites and applications for their business and their clients. But if you've built a plugin you would like to share with the community, there a few best practices you should follow.
Using Coding Standards
Devflow uses specific coding standards to help maintain consistency, quality, and clean code. The coding standard that Devflow uses and promotes is PSR-12 along with the Qubus Coding Standards.
Namespaces
Classes as well as function should be namespaced, unless there is a strong reason to not namespace a function. Namespacing functions is recommended and highly encouraged in order to keep the
global namespace clean and available for native PHP functions.
Security
You must always validate and sanitize data on output. Never trust user data that was inputted. If you use the native Devflow functions that output data, that data is already sanitized or purified.
Keep these things in mind when outputting data outside the native functions:
- Sanitize data on output by using helpers
Qubus\Security\Helpers\esc_html,Qubus\Security\Helpers\esc_html__,Qubus\Security\Helpers\esc_url,Qubus\Security\Helpers\esc_js, andQubus\Security\Helpers\purify_html. - Check user permission before executing or saving data to prevent unauthorized operations or access.
- Use the Devflow database helper (
App\Shared\Helpers\dfdb) and prepared statements to avoid SQL injection vulnerabilities.
Step #1: Create Your Plugin File
The first step is to create a folder for your plugin in the public/plugins directory. Your directory must meet PSR-4 autoload standards. For this example, we are going to create a New Widget plugin.
The name of the new folder will be NewsWidget and the name of the main class will be the same followed by the suffix Plugin.php: NewsWidgetPlugin.php.
NewsWidgetPlugin.php will extend the abstract class App\Infrastructure\Services\Plugin. We should now have a new class:
<?php

declare(strict_types=1);

namespace Plugin\NewsWidget;

use App\Infrastructure\Services\Plugin;

class NewsWidgetPlugin extends Plugin
{
    /**
     * @inheritDoc
     */
    public function meta(): array
    {
        // TODO: Implement meta() method.
    }

    /**
     * @inheritDoc
     */
    public function handle(): void
    {
        // TODO: Implement handle() method.
    }
}
We need to fill out the meta method to include our plugin's info:
name- The name of the plugin.id- Plugin's unique identifier. This is also used for your route if you need to register a submenu.author- Person or company who authored the plugin.version- Current version of the plugin.description- A short description of the plugin's purpose.basename- Filename of the plugin.path- File path of the plugin.url- Plugin's directory url.pluginUri- Where the plugin is hosted and updates found.authorUri- Website of the plugin author.className- Name of the class.
With the meta details filled out, this is now the state of our plugin class:
<?php

declare(strict_types=1);

namespace Plugin\NewsWidget;

use App\Infrastructure\Services\Plugin;
use App\Shared\Services\Registry;

use function App\Shared\Helpers\plugin_basename;
use function App\Shared\Helpers\plugin_dir_path;
use function App\Shared\Helpers\plugin_url;
use function dirname;
use function get_class;
use function Qubus\Security\Helpers\esc_html__;

class NewsWidgetPlugin extends Plugin
{
    /**
     * @inheritDoc
     */
    public function meta(): array
    {
        $newsWidgetInfo = [
            'name' => esc_html__(string: 'News Widget', domain: 'news-widget'),
            'id' => 'news-widget',
            'author' => 'Joshua Parker',
            'version' => '1.0.0',
            'description' => 'Adds a news widget to the admin dashboard.',
            'basename' => plugin_basename(dirname(__FILE__)),
            'path' => plugin_dir_path(dirname(__FILE__)),
            'url' => plugin_url('', __CLASS__),
            'pluginUri' => 'https://github.com/getdevflow/news-widget',
            'authorUri' => 'https://nomadicjosh.com/',
            'className' => get_class($this),
        ];

        Registry::getInstance()->set('news-widget', $newsWidgetInfo);

        return $newsWidgetInfo;
    }

    /**
     * @inheritDoc
     */
    public function handle(): void
    {
        // TODO: Implement handle() method.
    }
}
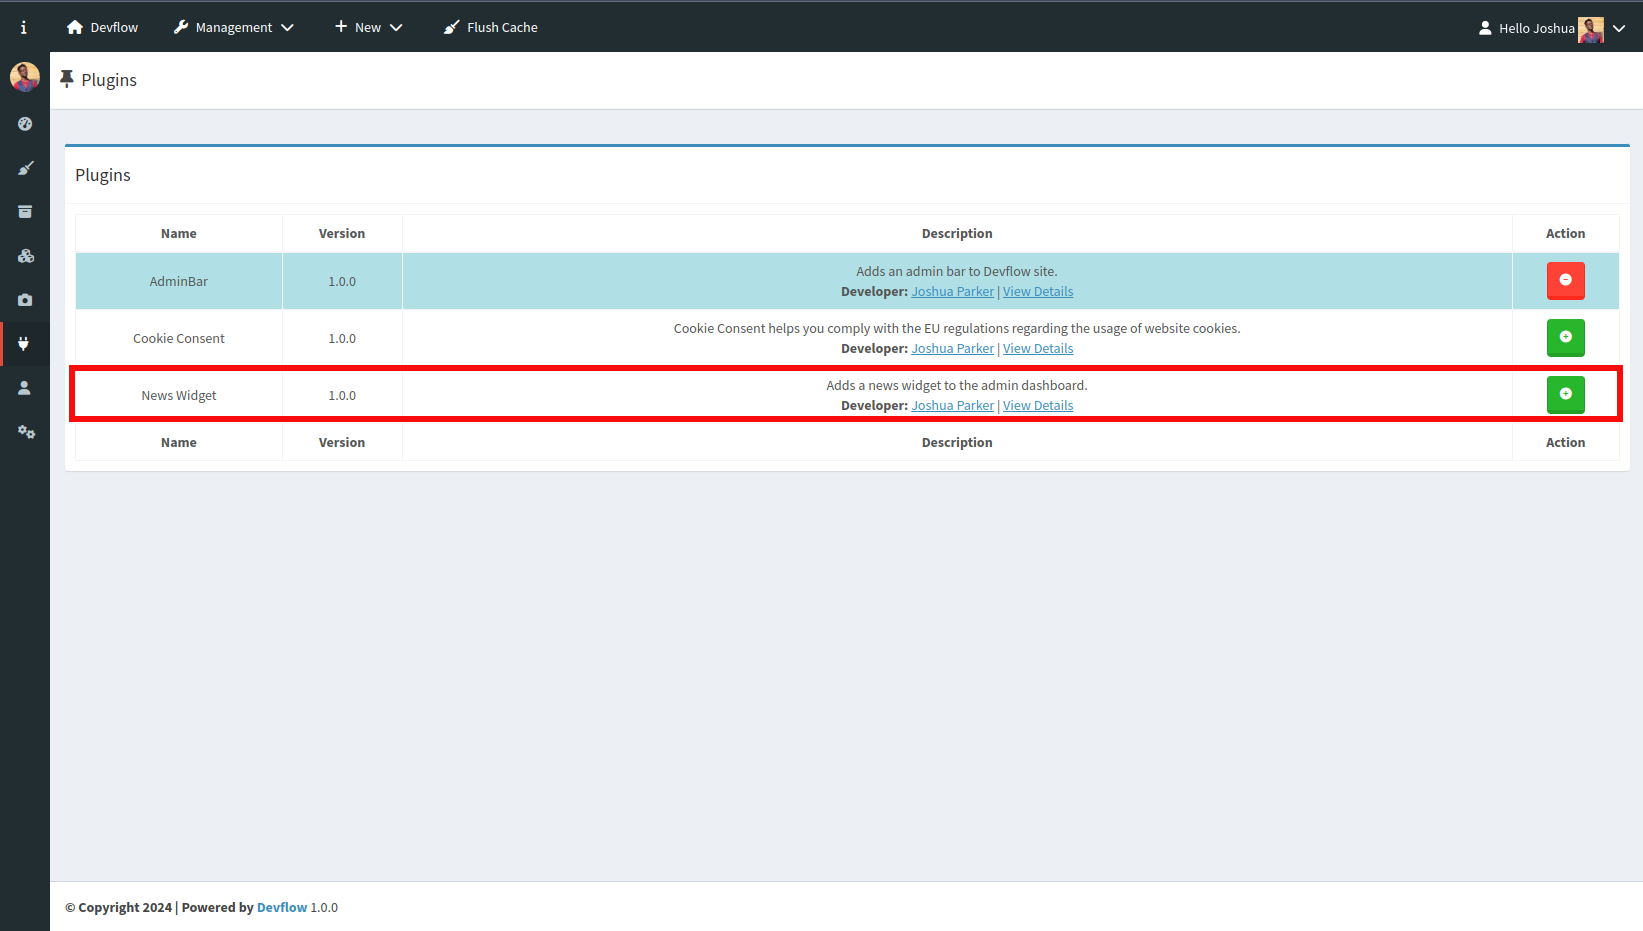
Now that the meta method is implemented, our plugin should now be registered on our plugins page:

Step #2: Create Other Methods (if needed)
For our plugin class, we will create another method called widgetNews which will give us the latest feed from TechCrunch:
/**
* @throws NotFoundExceptionInterface
* @throws ContainerExceptionInterface
* @throws ReflectionException
* @throws InvalidArgumentException
*/
private function newsWidget(): array
{
$cache = SimpleCacheObjectCacheFactory::make(namespace: 'rss');
$rss1 = new DOMDocument();
$rss1->load(filename: 'https://feeds.feedburner.com/TechCrunch/');
$feed = [];
foreach ($rss1->getElementsByTagName('item') as $node) {
$item = [
'title' => $node->getElementsByTagName('title')->item(0)->nodeValue,
'link' => $node->getElementsByTagName('link')->item(0)->nodeValue,
'date' => $node->getElementsByTagName('pubDate')->item(0)->nodeValue,
];
$feed[] = $item;
}
if ($cache->has(key: 'techcrunch')) {
$feed = $cache->get(key: 'techcrunch');
} else {
$cache->set(key: 'techcrunch', value: $feed);
}
$data = [];
$limit = 4;
for ($x = 0; $x < $limit; $x++) {
$title = str_replace(' & ', ' & ', $feed[$x]['title']);
$link = $feed[$x]['link'];
$date = date('l F d, Y', strtotime($feed[$x]['date']));
$data[] = '<p><strong><a href="' . $link . '" title="' . $title . '">' . $title . '</a></strong><br />' .
'<small><em>Posted on ' . $date . '</em></small></p>';
}
return $data;
}
The next method we will add will be render for our view:
/**
 * @throws ViewException
 * @throws NotFoundExceptionInterface
 * @throws InvalidTemplateNameException
 * @throws ReflectionException
 * @throws ContainerExceptionInterface
 * @throws InvalidArgumentException
 */
public function render(): void
{
    echo $this->view->render('plugin::NewsWidget/view/widget', ['data' => $this->newsWidget()]);
}
Step #3: Create Your View
Next, create a widget.phtml file in NewsWidget/view/ with the following contents:
<?php

use function Qubus\Security\Helpers\esc_html__;

$this->block('backend', function ($param) {
?>
    <div class="box">
        <div class="box-header with-border">
            <h3 class="box-title"><i class="fa fa-rss"></i> <?= esc_html__(string: 'TechCrunch Feed', domain: 'news-widget'); ?></h3>
            <div class="box-tools pull-right">
                <!-- Collapse Button -->
                <button type="button" class="btn btn-box-tool" data-widget="collapse">
                    <i class="fa fa-minus"></i>
                </button>
            </div>
            <!-- /.box-tools -->
        </div>
        <!-- /.box-header -->
        <div class="box-body">
            <?php foreach($param['data'] as $feed): echo $feed; endforeach; ?>
        </div>
        <!-- /.box-body -->
    </div>
    <!-- /.box -->

<?php }); ?>
Step #4: Implement the handle Method
Now we are ready to implement our handle method. The handle method is what the system looks for and will trigger your plugin to run. We want this widget to post to the left side of our dashboard, so we will use the widget_left_column action hook:
/**
 * @inheritDoc
 * @throws ReflectionException
 */
public function handle(): void
{
    Action::getInstance()->addAction('widget_left_column', [$this, 'render'], 5);

    Action::getInstance()->addAction('flush_cache', function () {
        SimpleCacheObjectCacheFactory::make(namespace: 'rss')->delete(key: 'techcrunch');
    }, 5);
}
We also will hook to the flush_cache action as well so that when the cache gets flushed, the TechCrunch feed cache will get purged as well. With everything in place, this is what our NewsWidgetPlugin class should look like:
<?php
declare(strict_types=1);
namespace Plugin\NewsWidget;
use App\Infrastructure\Services\Plugin;
use App\Shared\Services\Registry;
use App\Shared\Services\SimpleCacheObjectCacheFactory;
use DOMDocument;
use Psr\Container\ContainerExceptionInterface;
use Psr\Container\NotFoundExceptionInterface;
use Psr\SimpleCache\InvalidArgumentException;
use Qubus\EventDispatcher\ActionFilter\Action;
use Qubus\Exception\Exception;
use Qubus\View\Native\Exception\InvalidTemplateNameException;
use Qubus\View\Native\Exception\ViewException;
use ReflectionException;
use function App\Shared\Helpers\plugin_basename;
use function App\Shared\Helpers\plugin_dir_path;
use function App\Shared\Helpers\plugin_url;
use function date;
use function dirname;
use function get_class;
use function Qubus\Security\Helpers\esc_html__;
use function str_replace;
use function strtotime;
class NewsWidgetPlugin extends Plugin
{
/**
* @inheritDoc
* @throws ReflectionException
* @throws Exception
*/
public function meta(): array
{
$newsWidgetInfo = [
'name' => esc_html__(string: 'News Widget', domain: 'news-widget'),
'id' => 'news-widget',
'author' => 'Joshua Parker',
'version' => '1.0.0',
'description' => 'Adds a news widget to the admin dashboard.',
'basename' => plugin_basename(dirname(__FILE__)),
'path' => plugin_dir_path(dirname(__FILE__)),
'url' => plugin_url('', __CLASS__),
'pluginUri' => 'https://github.com/getdevflow/news-widget',
'authorUri' => 'https://nomadicjosh.com/',
'className' => get_class($this),
];
Registry::getInstance()->set('news-widget', $newsWidgetInfo);
return $newsWidgetInfo;
}
/**
* @inheritDoc
* @throws ReflectionException
*/
public function handle(): void
{
Action::getInstance()->addAction('widget_left_column', [$this, 'render'], 5);
Action::getInstance()->addAction('flush_cache', function () {
SimpleCacheObjectCacheFactory::make(namespace: 'rss')->delete(key: 'techcrunch');
}, 5);
}
/**
* @throws NotFoundExceptionInterface
* @throws ContainerExceptionInterface
* @throws ReflectionException
* @throws InvalidArgumentException
*/
private function newsWidget(): array
{
$cache = SimpleCacheObjectCacheFactory::make(namespace: 'rss');
$rss1 = new DOMDocument();
$rss1->load(filename: 'https://feeds.feedburner.com/TechCrunch/');
$feed = [];
foreach ($rss1->getElementsByTagName('item') as $node) {
$item = [
'title' => $node->getElementsByTagName('title')->item(0)->nodeValue,
'link' => $node->getElementsByTagName('link')->item(0)->nodeValue,
'date' => $node->getElementsByTagName('pubDate')->item(0)->nodeValue,
];
$feed[] = $item;
}
if ($cache->has(key: 'techcrunch')) {
$feed = $cache->get(key: 'techcrunch');
} else {
$cache->set(key: 'techcrunch', value: $feed);
}
$data = [];
$limit = 4;
for ($x = 0; $x < $limit; $x++) {
$title = str_replace(' & ', ' & ', $feed[$x]['title']);
$link = $feed[$x]['link'];
$date = date('l F d, Y', strtotime($feed[$x]['date']));
$data[] = '<p><strong><a href="' . $link . '" title="' . $title . '">' . $title . '</a></strong><br />' .
'<small><em>Posted on ' . $date . '</em></small></p>';
}
return $data;
}
/**
* @throws ViewException
* @throws NotFoundExceptionInterface
* @throws InvalidTemplateNameException
* @throws ReflectionException
* @throws ContainerExceptionInterface
* @throws InvalidArgumentException
*/
public function render(): void
{
echo $this->view->render('plugin::NewsWidget/view/widget', ['data' => $this->newsWidget()]);
}
}
And plugin's tree should look similar to this:
NewsWidget
├── NewsWidgetPlugin.php
└── view
    └── widget.phtml
Step #5: Activate the Plugin
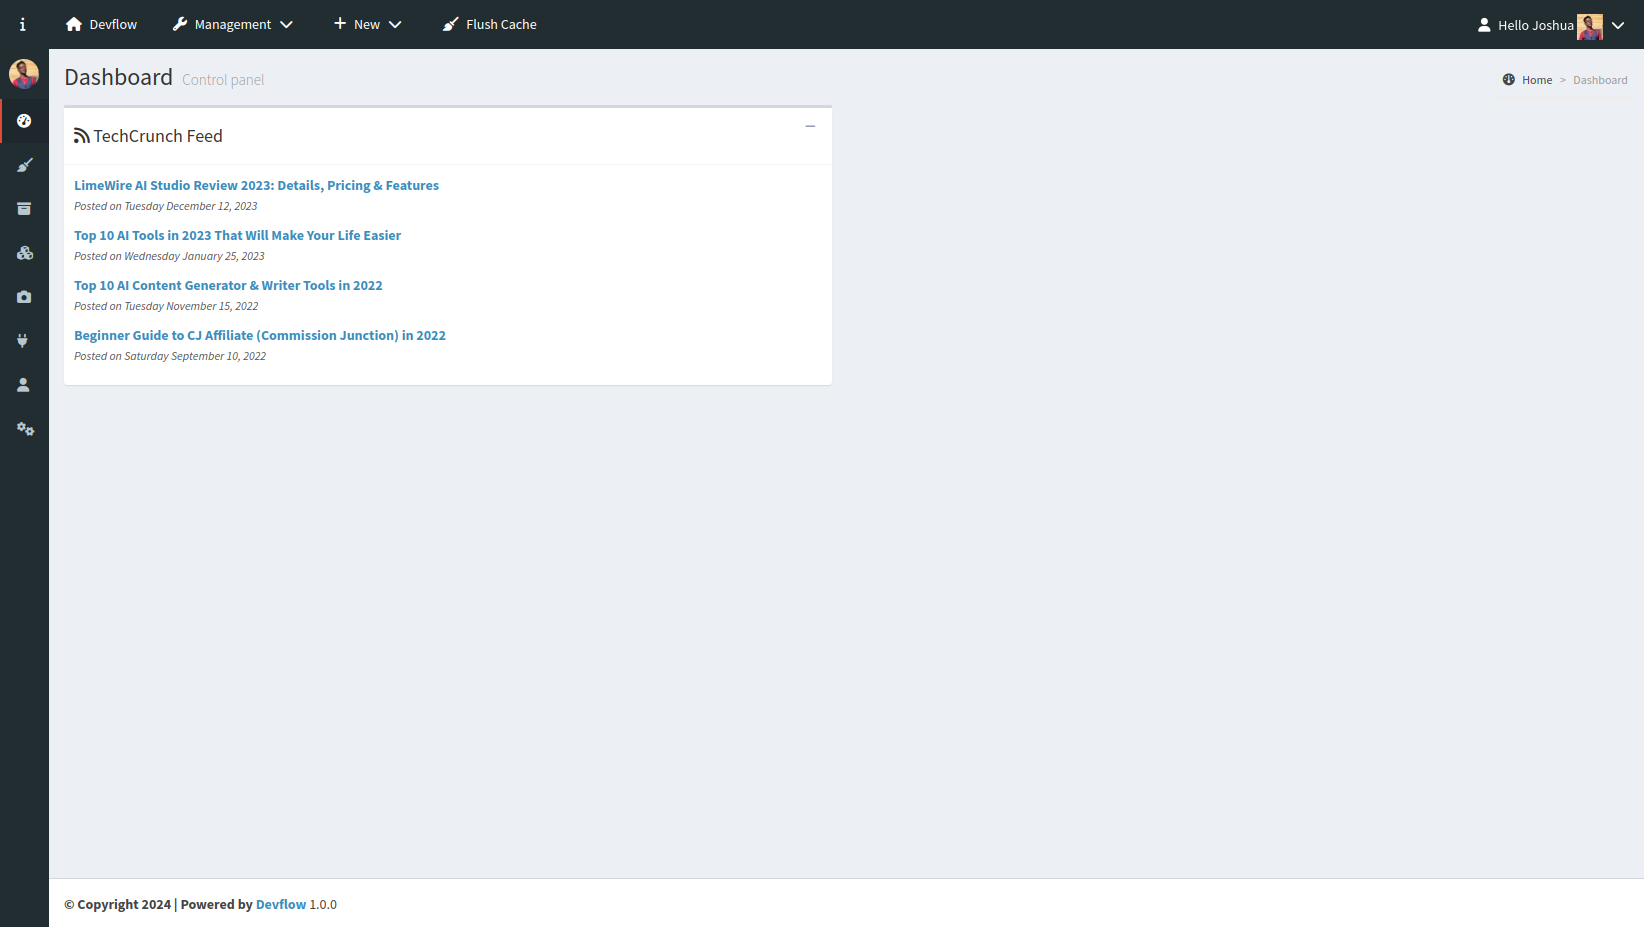
Once we activate our plugin, the new widget should appear on our dashboard:

Step #6: Share Your Plugin
If we wanted to share this plugin to allow others in the community to install it via composer, we would add a composer.json file to the root of our plugin's directory:
{
  "name": "getdevflow/techcrunch-news-widget",
  "description": "Adds a TechCrunch widget to the admin dashboard.",
  "type": "devflow-plugin",
  "keywords": ["techcrunch","devflow-plugin","plugins","widget"],
  "license": "GPL-2.0-only",
  "authors": [
    {
      "name": "Joshua Parker",
      "email": "joshua@joshuaparker.dev"
    }
  ],
  "require": {
    "php": ">=8.3",
    "oomphinc/composer-installers-extender": "^2.0"
  },
  "extra": {
    "installer-name": "NewsWidget",
    "installer-types": ["devflow-plugin"]
  },
  "minimum-stability": "stable",
  "prefer-stable": true,
  "config": {
    "allow-plugins": {
      "composer/installers": true,
      "oomphinc/composer-installers-extender": true
    }
  }
}
There are several important key points to point out in the json data above:
- Make sure to change the vendor name
- Make sure to add the type
devflow-plugin - Make sure to include
installer-nameand make it PSR-4 compatible. It will install the plugin asNewsWidgetinstead of astechcrunch-news-widget. - Make sure the
installer-typesincludesdevflow-plugin
When someone runs composer require getdevflow/techcrunch-news-widget, the plugin will be installed with the correct folder name public/plugins/NewsWidget/.
There you go. These are the steps you can take to create a plugin as well as how to share your new plugin with the Devflow community.
Any plugin added to Packagist with the above composer.json information, will appear on the Devflow extensions page of the main website.